
Learn Photography Basics
Learning the foundational principles of photography doesn’t have to be complicated, in fact we’ll be covering more than 85% of the basics right here in this article! To do that you’ll need to fully understand what exposure is and how to manipulate it properly using shutter speed, aperture, and ISO. Most importantly we’ll be covering how to use these settings to unlock your creativity in your photography.
By the end you should have a good grasp on how to use manual mode (or aperture/shutter priority), understanding the exposure triangle, and even a great bonus tip to get exposure right using the histogram. Of course this will be a written article but if a video format facilitates your learning, be sure to watch this to help understand these concepts even better!
What is Exposure?
Before learning anything else, the first thing you must understand is Exposure. Not how to manipulate it, simply just knowing what exposure is, because it is the foundation of every topic we’ll discuss today.
Photography at its core is the art of capturing light. The amount of light we capture is typically denoted as Exposure Value (EV), and is measured in units of “stops of light.” Stops of light are not scientific units of measurement for light, that would be Lux or Lumens, however they are what is used in relation to a camera.
Above you can see three images. The left is -1 EV and “underexposed,” the right picture is +1 EV and is “overexposed,” the middle is 0EV is “correctly exposed”. Exposure value is typically the little meter you see in these images that is located on most cameras and goes from -3EV to +3EV.

To manipulate exposure in photography there are three adjustable components: shutter speed, aperture, and ISO. You might have heard of these referred to as the exposure triangle. The reason they are commonly referred to as a triangle is because if you draw a triangle and designate each corner to shutter speed, aperture, and iso.
Then put exposure (EV) in the center of the triangle. This creates a nice visual to remind you that these three components must work together to properly expose an image. Thus if you increase the stops of light from one of them, then you’ll need to decrease stops of light from another to get the “correct exposure”.
Exposure of light is either captured by a digital sensor or by film that absorbs the light and produces an image. Our goal in photography is to capture a properly exposed image that isn’t too dark or too bright with the intention of editing it later on. One thing to keep in mind is that when learning photography, I will continually repeat the words “correct exposure” or 0EV, the reality is there isn’t a defined perfect exposure, recently I did a video breaking this rule altogether. However in learning, it’s a great foundation to start off with in understanding exposure and then you can break this rule however you’d like.
A shutter is a mechanical curtain that is closed in front of your cameras sensor or film to not allow light in until you want to create an image. When you take an image, the shutter will open for a certain duration of time and this duration of time is known as your shutter speed. This duration dictates how long your sensor is exposed to light. Meaning the faster your shutter speed, the less light you’ll let in and vice versa - the longer your shutter speed, the more light you’ll let in.
What is Shutter Speed?
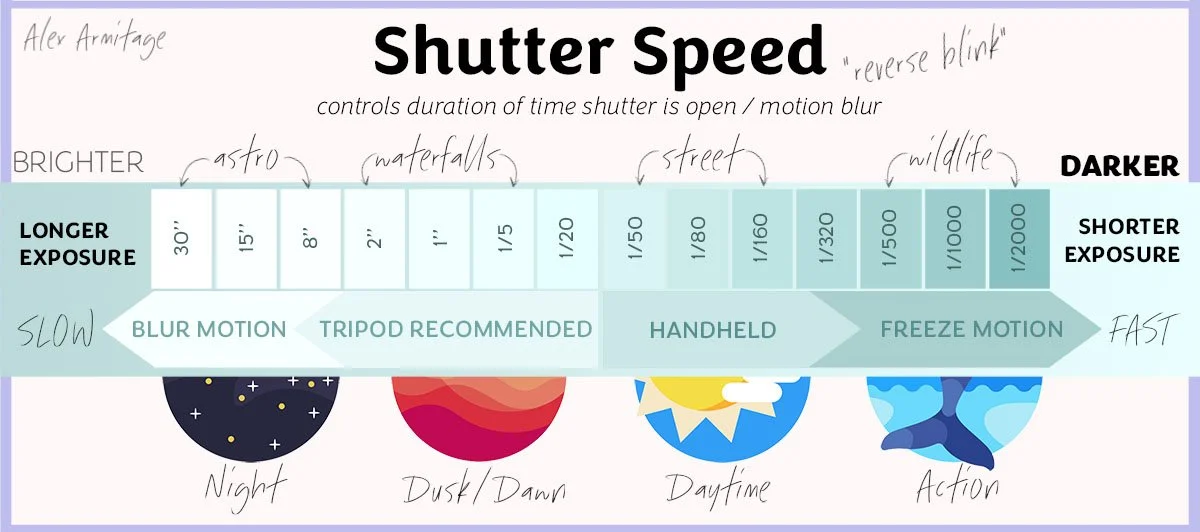
Typically shutter speed is denoted in fractions of seconds. For example 1/200s would be a fast shutter speed, 1/2000s would be a REALLY fast shutter speed. The opposite end of the spectrum: 1/20s would be a slow shutter speed and 2 seconds would be a really slow shutter speed. (above image is part of my photography basics cheats sheet which you can grab here for free!)

Measuring stops of light with shutter speed is quite easy. Anytime you either cut your shutter speed in half, or you double it - you’ve effectively halved or doubled the amount of light you capture, which is exactly 1 stop of light.
An example: If you take an image that is properly exposed at 0EV with a shutter speed of 1 second and change the shutter speed to 2 seconds, you are doubling the amount of time the shutter is open, thus doubling the amount of light resulting in a gain of 1 stop of light giving us an over exposed image with +1EV. It works the same in reverse, If you take that 1 second exposure and make it .5s, you have essentially cut our light in half, resulting in an underexposed image with -1 EV.
Aperture are mechanical blades located within your lens that form a ring that can open and close to create a larger and smaller hole. This hole is your aperture. The larger the hole, the more light your lens will pass through to your sensor or film. The smaller the hole, the less light. This is also commonly referred to as the iris because you can think about it like the iris of your eye; where your iris gets smaller in bright scenes to let less light in, and it opens up big at night to let more light in.
What is Aperture?

Aperture is measured in “f-stops.” Common fstops are f/2.8, f/4, f/5.6, f/8, or f/11. Unlike shutter speed which uses a unit of measurement we all inherently understand, time. Aperture does not and can be a bit more complicated for people to understand, but there’s a really easy trick to remember it. Think of the number ZERO as a giant hole kind of like the shape of a lens. The further away you get from zero, the smaller your hole. Thus an fstop of f/1.4 is pretty close to zero, so a bigger hole meaning more light, where as an fstop value of f/11 is much further away from 0 meaning a smaller hole and less light.

Measuring stops of light with aperture can be a bit tricky because it’s on a logarithmic scale. For example: going from f/2 to f/2.8 is an one stop of light and going from f11 to f16 is also one stop of light. This isn’t something you need to remember or even calculate on the fly, feel free to grab my free Photography Cheat Sheet to help!
What is ISO?
ISO is how sensitive your sensor or film is to light. ISO manipulates exposure slightly differently than aperture and shutter speed because it is not physically manipulating the light passing through your camera, it is only controlling the gain (or sensitivity) of your sensor or film.
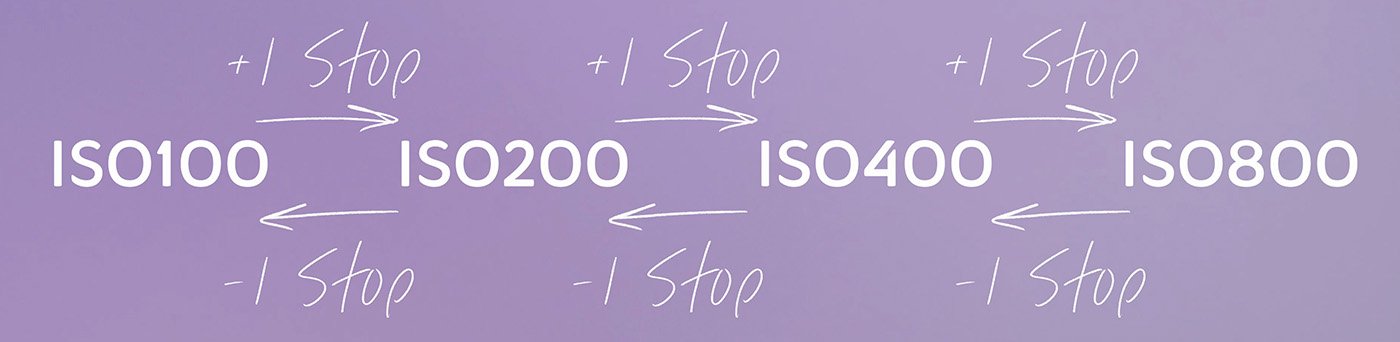
Increasing the ISO increases your exposure. Decreasing the ISO decreases exposure. ISO is measured with standardized numbers such as 100, 200, 400, 1600, and 3200 (theres many more). ISO has the easiest measurement of stops of light in that every time you double the ISO value, you gain 1 stop of light. For example going from ISO 100 to ISO 200 will give you 1 stop of light, thus doubling the exposure. If you go from 200 to 400, the same thing, 400 to 800 - the same, etc. ISO Is not an acronym.
The Histogram

One of the best ways to get exposure “correct” every single time is to use more than just your exposure meter. A histogram is essentially just a mathematical graph of the exposure values in your image. Just like the EV bar, if your graph is too far to the left it’s underexposed or if it’s too far to the right it’s likely overexposed. Your goal is to get the graph somewhere in the middle without it touching either side.
When a bar is touching one of the sides it means you’ve got parts of the image that will have zero data in them, which is what we want to avoid. The reason this is important to use is you can’t always trust your eyes as they adjust for how bright or dark it is outside but you can always rely on a histogram. If you find yourself taking an image and your EV bar says your exposure is correct but your histogram has a large bar like the in the left picture above, you’ll need to decrease your exposure overall so that you can do what’s called “protecting highlights”.
Later on when you sit down to edit you can brighten the image back up, but our goal here is to walk away with an exposure that captures all the details. You can enable your histogram on most modern cameras by cycling through the rear info displays on Canon, Nikon, Sony, and Fuji.
ISO & Noise
So now you know how each settings relates to exposure but this doesn’t give you any understanding or ability in what these settings do creatively. Thus once you understand exposure and feel comfortable, we can now dive into understanding what each setting does creatively.

First let’s start with the easiest one, ISO. By increasing your ISO you will increase the noise in your image. ISO has zero impact on your images creatively and only affects the final quality of your image.
Think about it like you’re listening to music on the radio, although I suspect many of you reading this right now might not have ever even used a radio, but hopefully you can follow. As you turn up the radio, the music gets louder but simultaneously it also becomes more distorted and filled with static. This is exactly the same for ISO. As you increase the ISO, your exposure will get louder (brighter) at the cost of more static. This reminder plus much more is included in my Photography Cheat Sheet!
A rule of thumb is to set your ISO last after deciding on your shutter speed and aperture. My advice though is as you’re learning photography, just set your ISO to auto. Many modern cameras allow you to set boundaries on your auto ISO so that it won’t go too high, however with modern denoising and newer cameras, I’ve taken plenty of perfectly professional high ISO images. Thus especially when you’re learning, set it and don’t even worry about it. This will drastically expedite learning photography and once you feel super comfortable with shutter speed and aperture, then you can worry about ISO.
Shutter Speed & Motion Blur
Shutter speed is all about how much you want to freeze motion. As a baseline for most genres of photography that typically include things in motion like street, weddings, or wildlife you typically want to freeze motion enough so that everything is sharp.
To do this you’ll need a faster shutter speed. Something like 1/200s for street photography, 1/400s for walking down the aisle, or 1/1000s or more for birds in flight. Learning the correct speeds will come with practice and one thing to keep in mind is you can’t ever have too fast of a shutter speed when it comes to freezing motion.
As a landscape photographer, I spend a lot of my time on a tripod trying to blur motion. Allowing movement and motion in my image to have a creative effect such as smoothing out water from a waterfall, these are created using longer shutter speeds like 1/2s or 1/5ths.
.4s Shutter Speed
.3s Shutter Speed
While shutter speeds main creative control is motion blur, it is also the main factor in getting sharp images. If you’re hand holding your camera there is a threshold or minimum shutter speed you’ll need so that your images don’t come out blurry from camera shake. This minimum has a lot of factors like how long the focal length is you’re shooting at, how stable you are standing, how new your camera and lens are because of internal stabilization.
A quick standard rule of thumb when using a modern camera is to make sure shutter speed is at least your focal length, ie your shooting at 50mm then shoot at at least 1/50s, 100mm shoot at at least 1/100s, etc. And you can double these numbers if you’re still getting camera shake when hand holding. If you unsure, just check a few images by zooming in and seeing how sharp they are after you take them. My photography cheat sheet has rough estimates for different styles of photography that you can see below.
1/6s Shutter Speed
Aperture & Depth of Field
Aperture controls how much of your image is in focus or “blurry” and this is typically referred to as depth of field in photography. For simplicity sake you can think of it as a scale to how blurry you want parts of your images to be.
Shot at f/2.8 on crop-sensor Fujifilm X100VI
Shot at f/4 on full-frame Canon R5 with RF 14-35 f/4
Large apertures such as f/1.8 or f/2.8, remember those are closer to 0 so they let in more light, will create images with a shallow depth of field meaning the images plane of focus is very thin. This is creatively used to help single out a subject in your image and direct your attention to whatever it is you want a viewer to look at. If you’ve ever shot on portrait mode on your phone’s camera, this is attempting to mimic a shallow depth of field.
Notice the blurry backgrounds in both above images but also pay special attention to the image of the camera in my hand. Notice that even parts of the camera are blurry, this is place my plane of focus is very thin when the subject is so close to the camera.
You might encounter people discussing a term called Bokeh in regards to a shallow depth of field. This is the name given to the area that is out of focus and how well the lens you’re using might render that area. Many photographers are very picky about what bokeh they find pleasing.
Shot at f/8 on full-frame Canon R5
Shot at f/11 on full-frame Canon R5
My expertise as a landscape photography is on the other side of the aperture spectrum which is dealing with smaller apertures such as f/8, f/11, and f/16. These smaller apertures create a deeper depth of field thus hopefully not blurring any parts of my image so that it is all in focus and sharp.
Shot at f/16 on full-frame Canon R5
Shot at f/9 on full-frame Canon R5 with RF 70-200 f/4
Shot at f/4 on full-frame Canon R5 with RF 70-200 f/4
Depth of field and aperture are a bit more complicated than I’ve covered in this article but this is enough to get you started. I’ll give you an example to get your brain turning. Notice the two images above using the same lens and camera. The left image with a relatively small aperture of f/9 renders much of the image out of focus, yet in the second image the majority (besides the foreground) of the image is in focus while shooting at the len’s smallest aperture of f/4!
This is because subject distance also matters! Not something you need to worry about for now, but as you keep shooting it will be something you learn. If you need a quick reference, just like with everything else in this article, my photography cheat sheet covers it all.
Now to put it all together for you to go out and learn. I highly recommend not immediately jumping into manual mode on your camera until you feel comfortable. Instead try learning one thing at a time using either Aperture priority or Shutter priority on your camera. These modes combined with my advice earlier to set your ISO to auto means that you can focus on one thing at a time.
By setting your camera to aperture priority it lets your camera decide on shutter speed and ISO so you can learn more about depth of field by changing your aperture. Exactly the same for shutter priority where your camera will automatically choose your aperture and ISO so you can focus on what shutter speed does. By doing it this way, you can learn one thing at a time without feeling overwhelmed.
