


The Lightroom Editing Companion
This is NOT just a preset pack. This is a complete editing system which will teach YOU to edit in Lightroom like I do.
The Lightroom Editing Companion includes:
Downloadable Lightroom Presets to Facilitate My Guided Workflow
Powerful Editing Tools to Build Any Edit
In-Depth Companion that Answers “Why?” as well as “How?”
Future Updates With New Tools, Techniques, and Videos
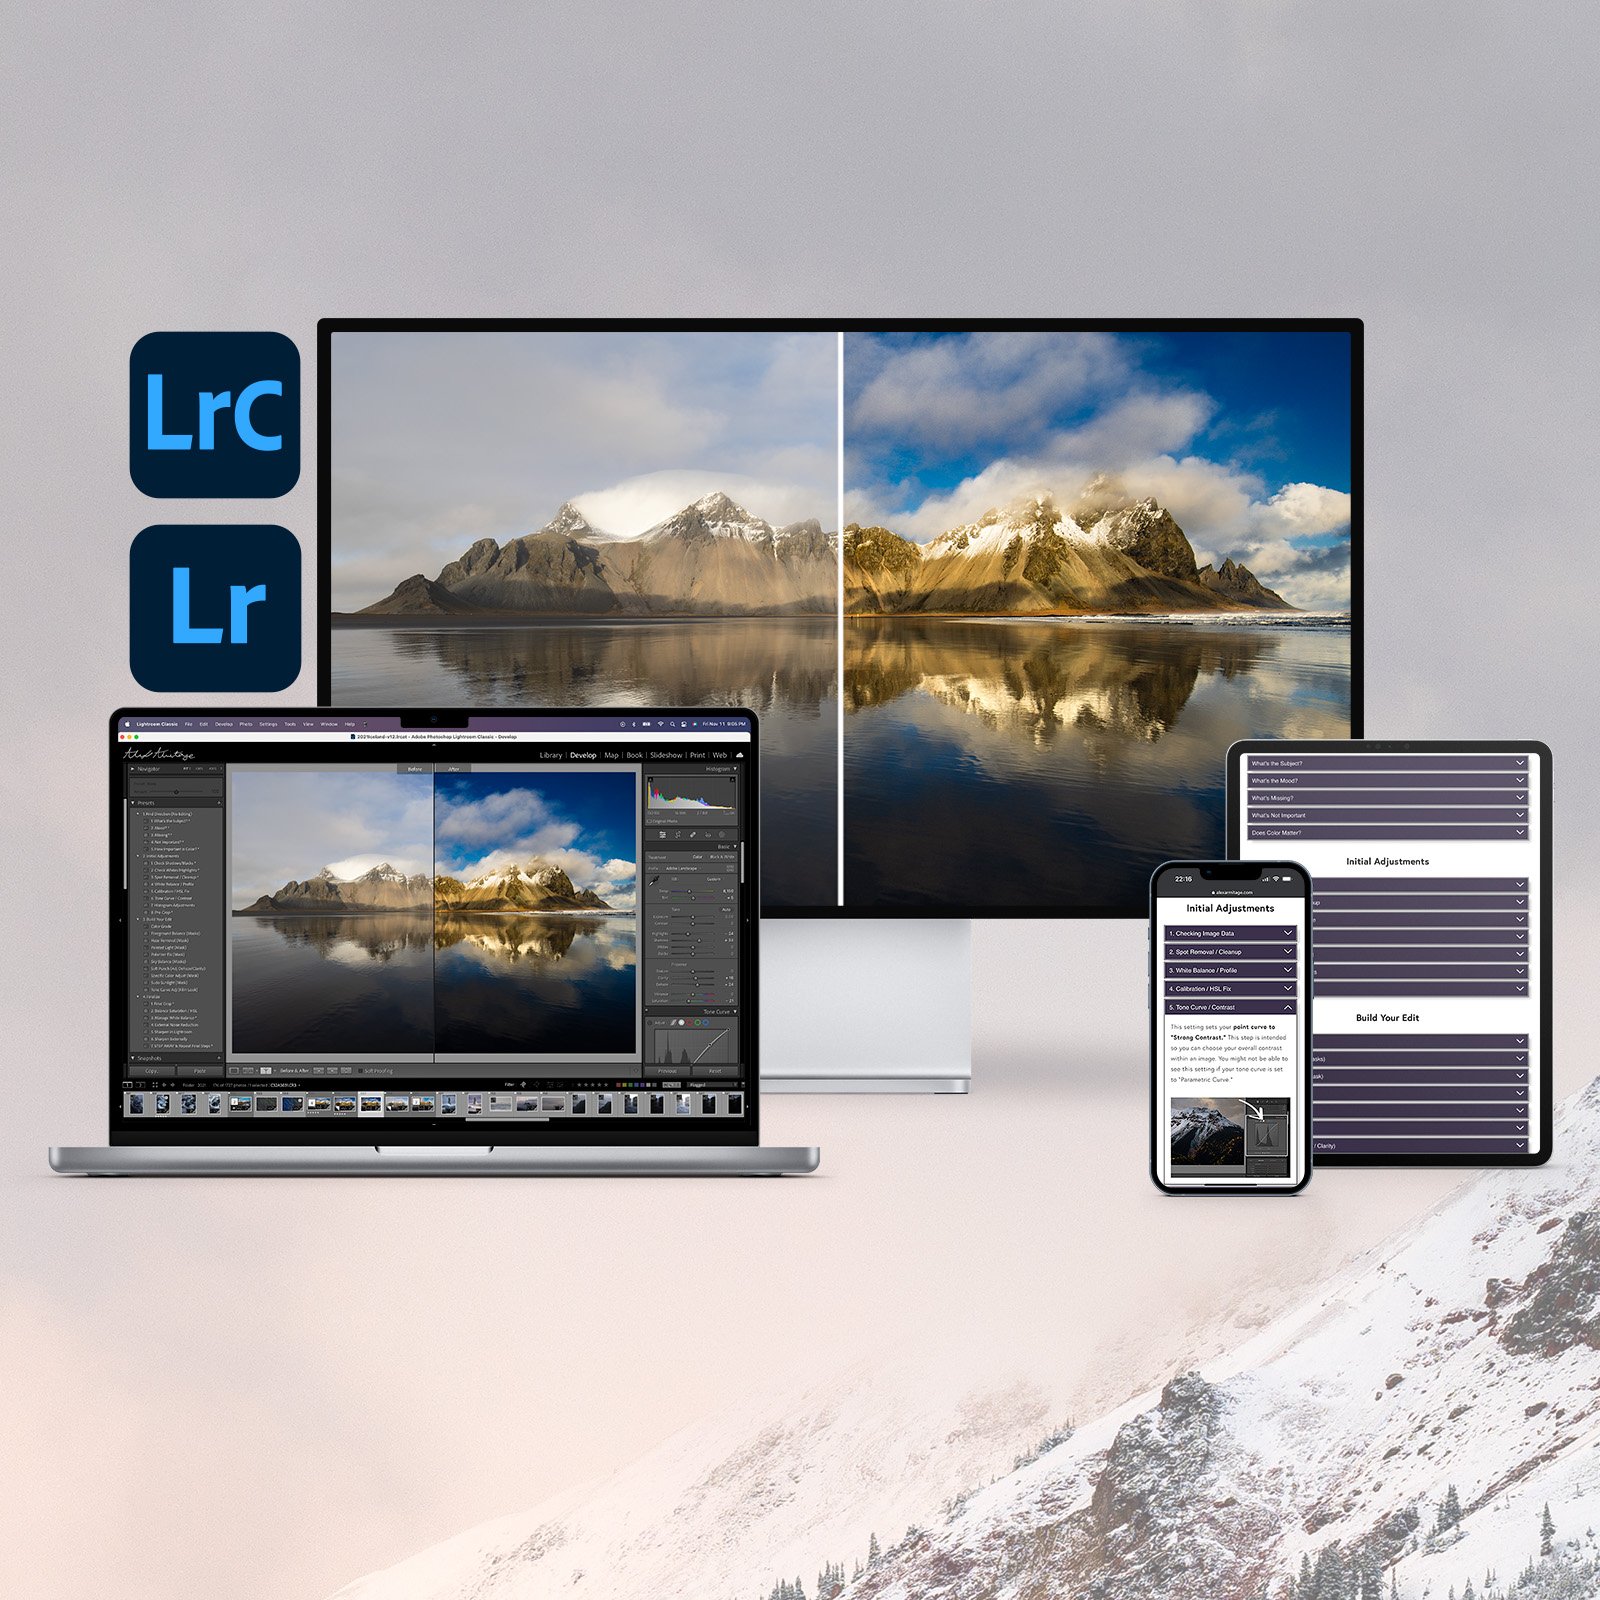
Developed for Lightroom Classic, Compatible with Adobe Camera Raw, Lightroom, and Lightroom Mobile
This guide will be most useful to photographers with a basic knowledge of editing concepts such as: shadows, highlights, exposure, etc.
This is NOT just a preset pack. This is a complete editing system which will teach YOU to edit in Lightroom like I do.
The Lightroom Editing Companion includes:
Downloadable Lightroom Presets to Facilitate My Guided Workflow
Powerful Editing Tools to Build Any Edit
In-Depth Companion that Answers “Why?” as well as “How?”
Future Updates With New Tools, Techniques, and Videos
Developed for Lightroom Classic, Compatible with Adobe Camera Raw, Lightroom, and Lightroom Mobile
This guide will be most useful to photographers with a basic knowledge of editing concepts such as: shadows, highlights, exposure, etc.

How Does it Work?
Most preset packs are meant to provide a few “looks” without teaching you anything about editing. This style of editing can work for genres of photography such as street photography or portrait work but it rarely works for landscapes. The challenge is that editing isn’t a linear process; there isn’t a concrete step by step process to edit your image which makes it difficult to learn and teach, until now.
Your Editing Companion
Every step has an accompanying section in the companion article, which will be your guide through every edit.
In the first section, you'll find 5 guiding questions that will direct your editing process and my personal advice on how to decide what your image needs BEFORE you start editing. For every tool within the pack you’ll find explanations on how that tool works, but more importantly why and when you should use it. I’ve created videos on a lot of these techniques that will explain in-depth exactly what everything does With practice, you will eventually reach a point where you won't need to reference the companion article anymore and can simply follow the workflow guide right in Lightroom.
Below you’ll find 3 sample sections from the companion.
This darkens your shadows to possibly represent the areas that might not be as important. Opposite to figuring out what's missing from your photo you should ask what isn't important that is there. Most photos you take have areas that simply aren’t important in the photo. That doesn’t mean you need to remove them, but you should make sure they aren’t distracting to what is important in the photo when your edit is done.
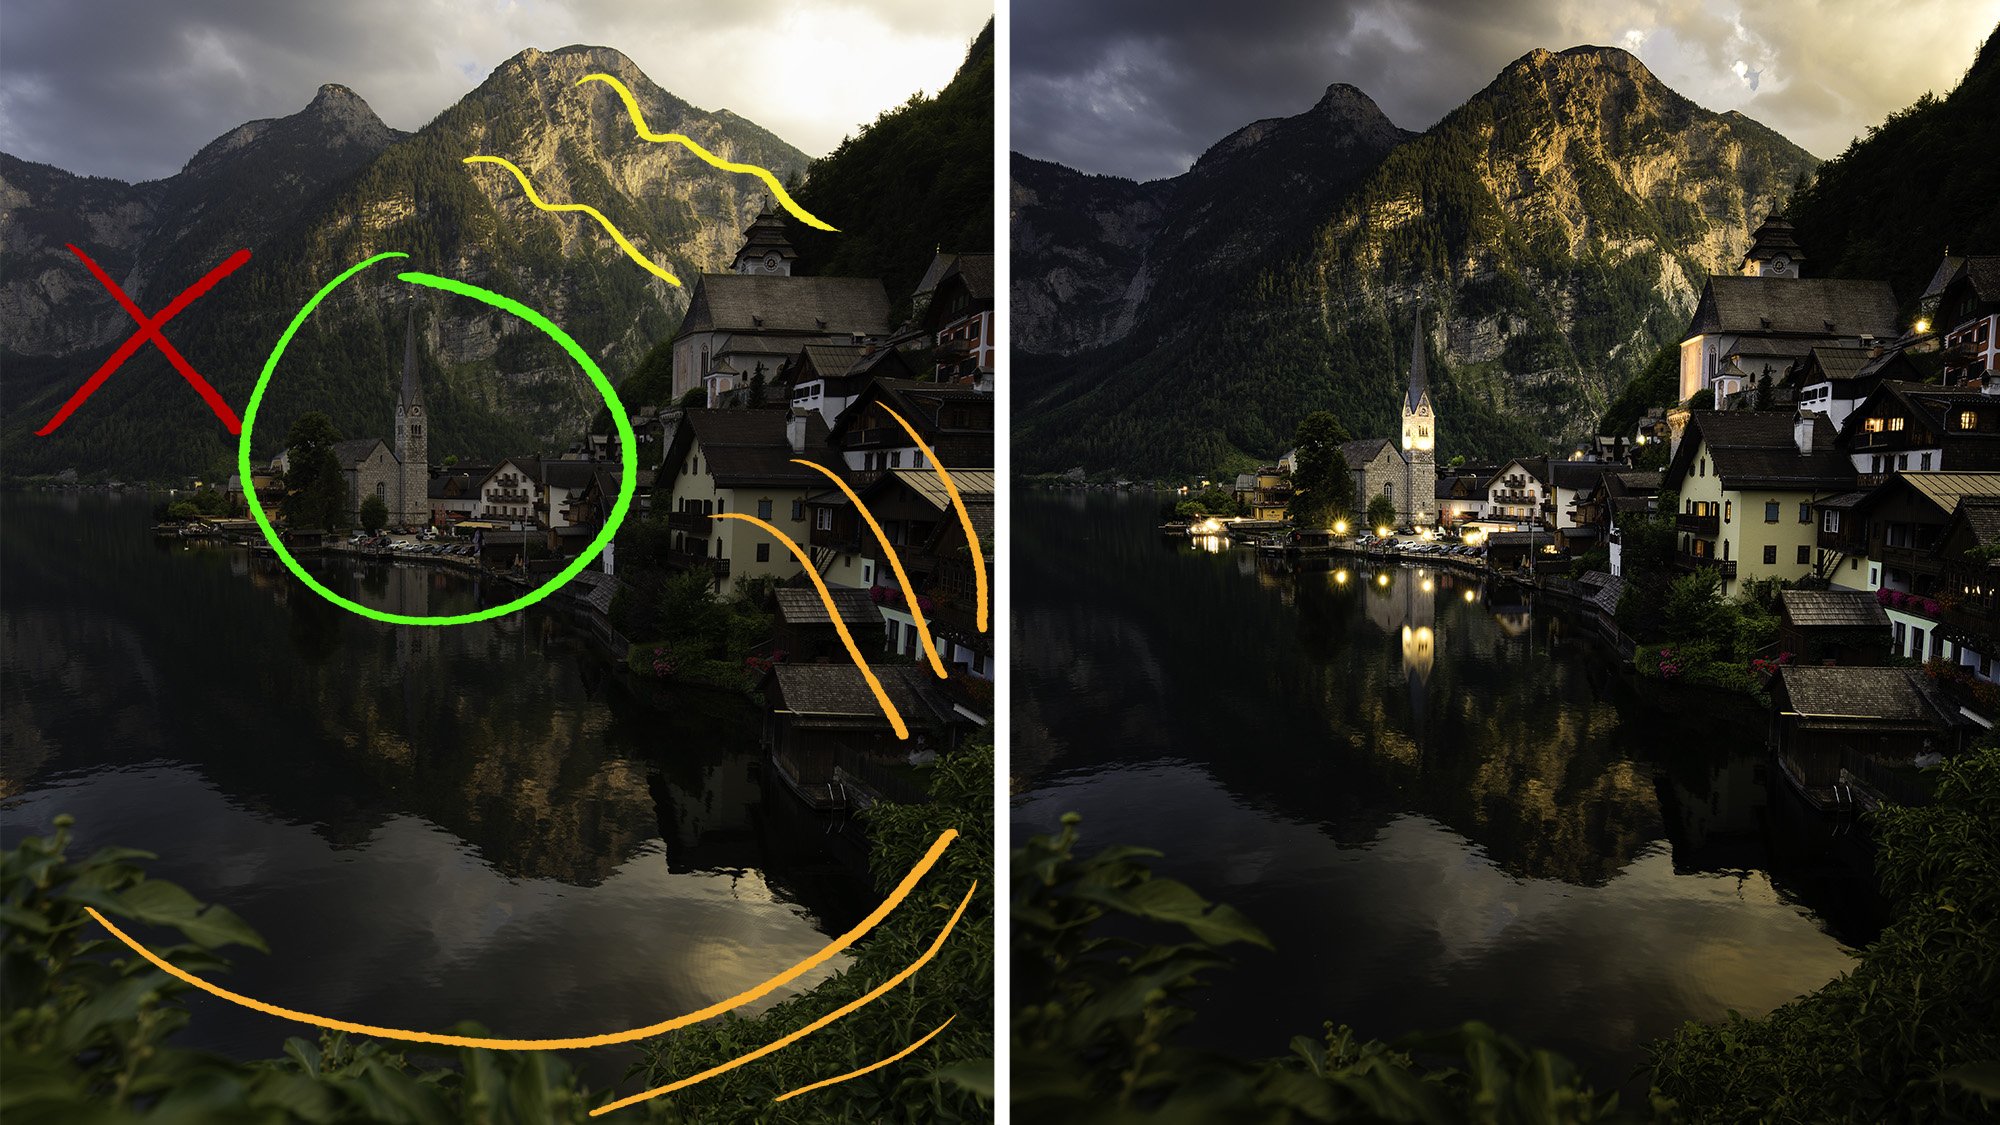
There’s a lot going on here, especially before the edit. Let’s focus on what isn’t important in this photo. The bottom leaves are important but are not the subject, the houses on the right are important but shouldn’t be the first thing you look at. The area in the top left is not important. Yes, it exists to contrast the right side of the frame where there is light, but mostly it’s not an area a viewer will ever really look or care to look at. It exists so other parts of the photo stick out.
Going through your photo and categorizing areas that are important and not important can give you much-needed guidance in tackling hard edits. Instead of trying to decide what a photo needs all at once, you can break it down into sections which can really help with busy photos like the example above.
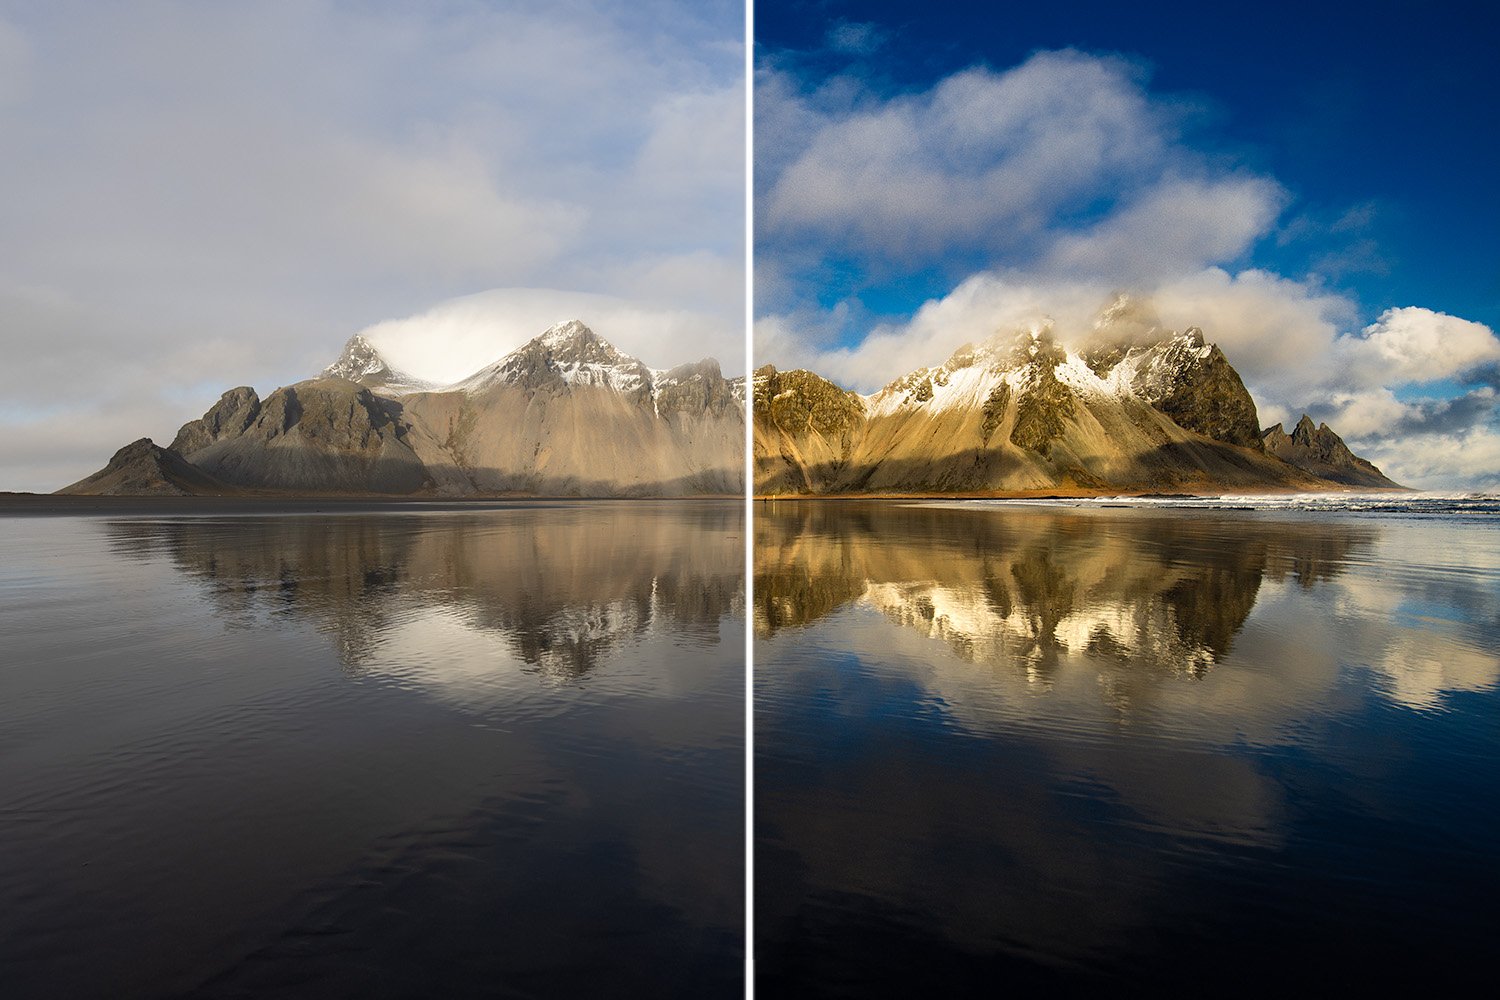
This sets your White Balance to “Auto”. Do NOT leave this set to auto unless you prefer the look within that particular photo. I set this to use “Auto” so you can get a sense of what your image might look like with a white balance that Lightroom thinks is correct. Choosing a white balance isn’t straight forward and many times in landscape photography there is no right or wrong answer depending on your image. I highly recommend you watch my video on the subject to fully understand what white balance is and how to use it within your editing.
This setting will set your color Profile to Adobe Landscape. This is the color profile I use for 99.9% of my photos, feel free to change this if it’s not your preferred profile. The Adobe Landscape profile adds a bit of vibrancy into the image, adds a touch of warmness, and contrast.
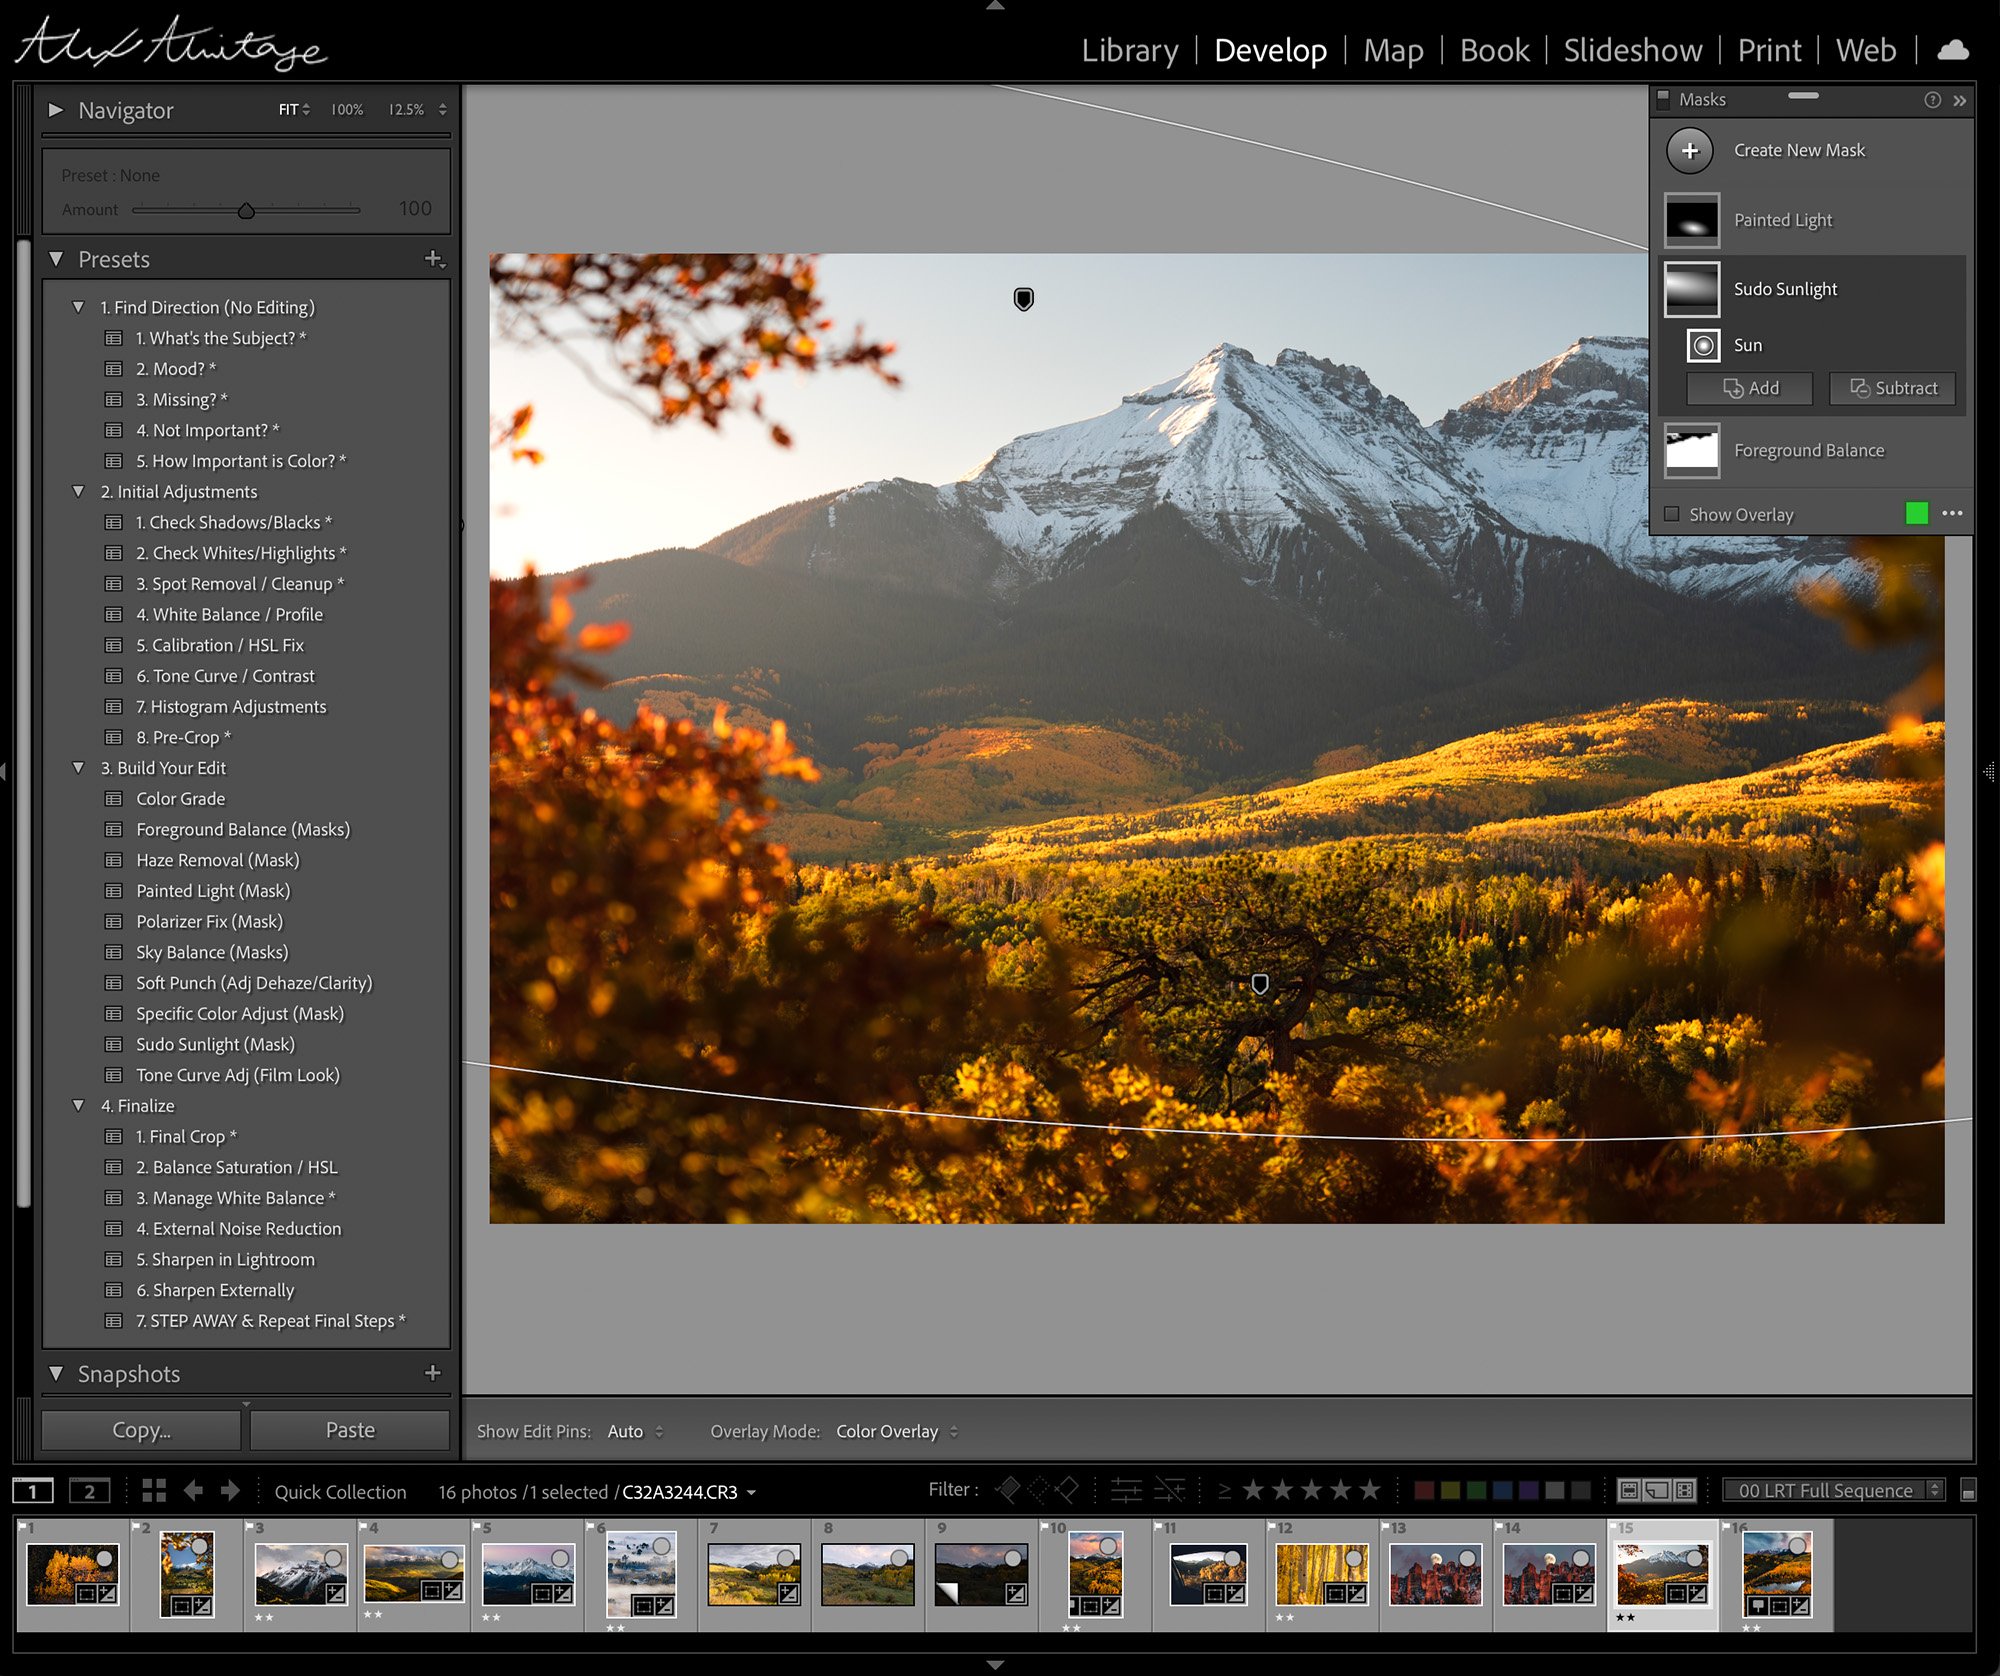
This creates a color range mask that you will need to adjust for the color within your image. Select the mask “Specific Color Adjust” in your masks window. Within that you’ll see the “Change Color” mask. Once selected, find the color range dropper for the mask and find the color you want to adjust, then use the refine slider while holding option/alt to edit the selection. The mask has a setting of Temp +10, EV +.1, and Whites +10. These are highly dependent on what you’re trying to accomplish with this mask. An example would be brightening golden aspen trees in an image. Or you might want to darken the green area of an image. I highly recommend you check out my video on this subject to see just how powerful this can be.
Example Photos


Developed for Desktop & Mobile Compatible
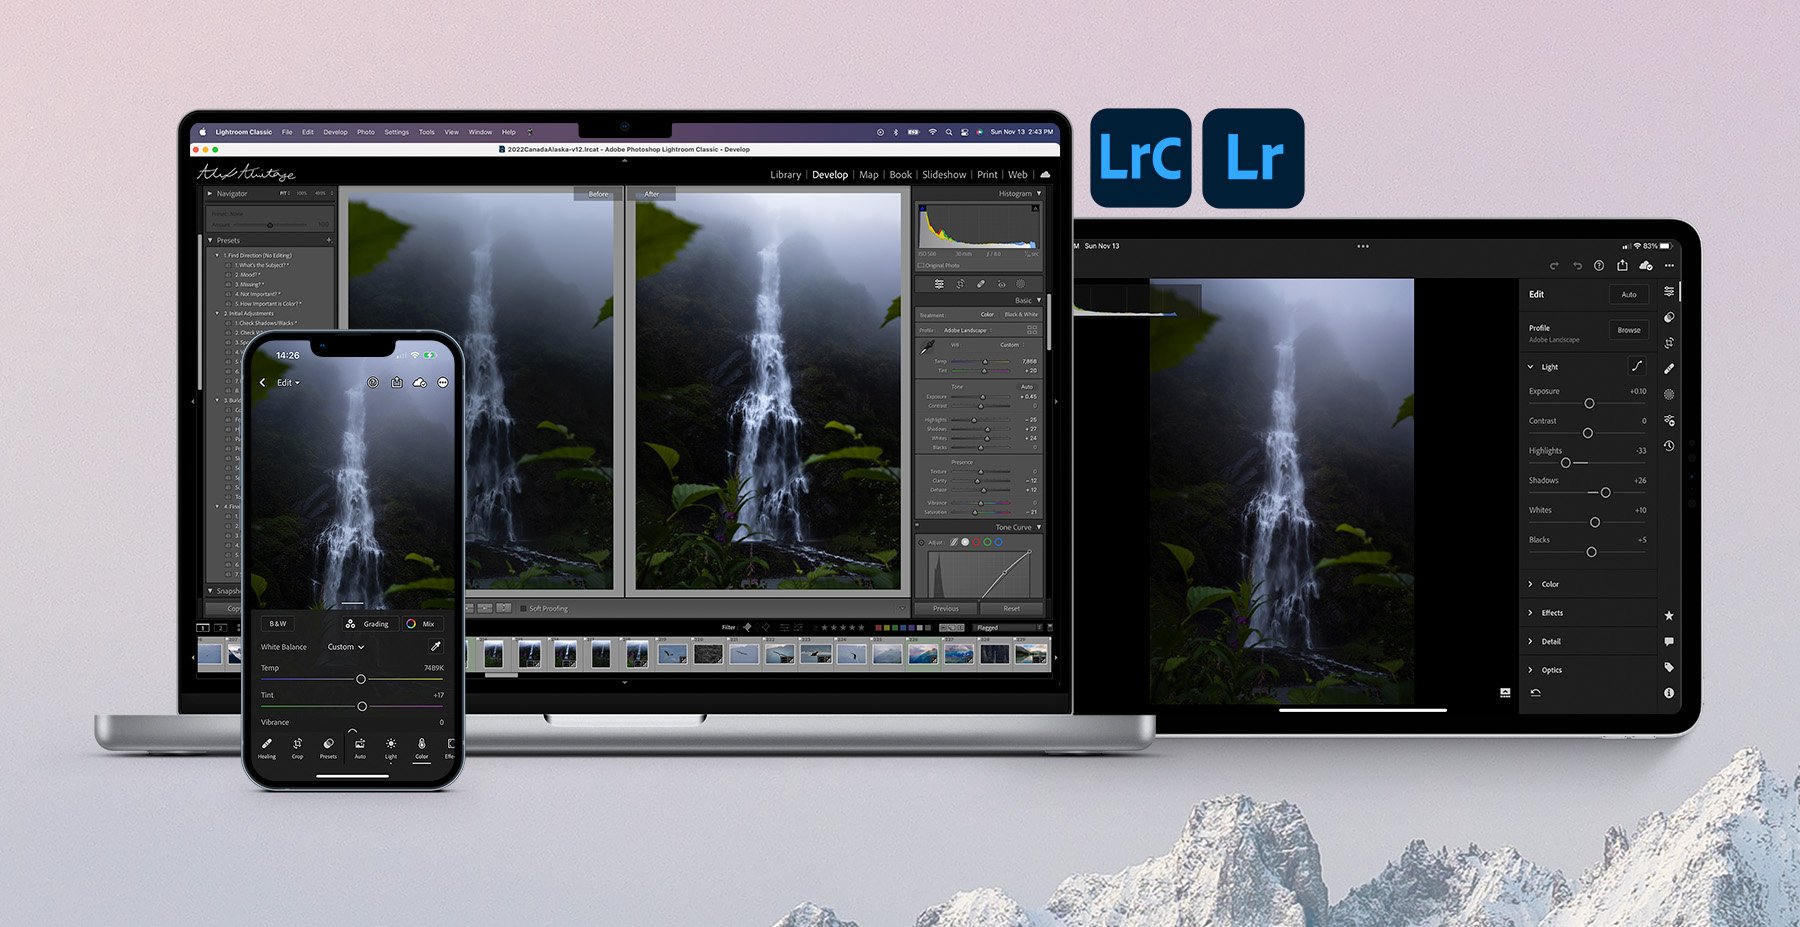
This system was developed for Lightroom Classic and is tested to work on v11, v12, and v13 (2023). It works seamlessly within Lightroom for Desktop, Adobe Camera Raw (ACR), and Lightroom Mobile however all of instructions within the companion originate from within Lightroom Classic. Most of the settings function the same, but their interface and location are in different spots. The main setting that doesn’t make its way into non-classic is the calibration tab which you can see I talk about in depth here, you’ll still have access to the setting (it’s hidden in Lightroom) with this download, you just cannot access the calibration tab. If there is enough interest and feedback I will make a companion and workflow guide using non-classic Lightroom so please contact me if you’re interested.
How to Install
Once purchased, you’ll receive a download that will contain all the necessary preset files and login information for the companion article. Here’s how you install presets in Lightroom Classic and Lightroom for Desktop.
Extract the zip file that contains the presets and other information. You should see a “PRESETS” Folder and a PDF document with these instructions and login info for the companion
In Lightroom (Classic or Desktop) go to File > Import Develop Profiles and Presets
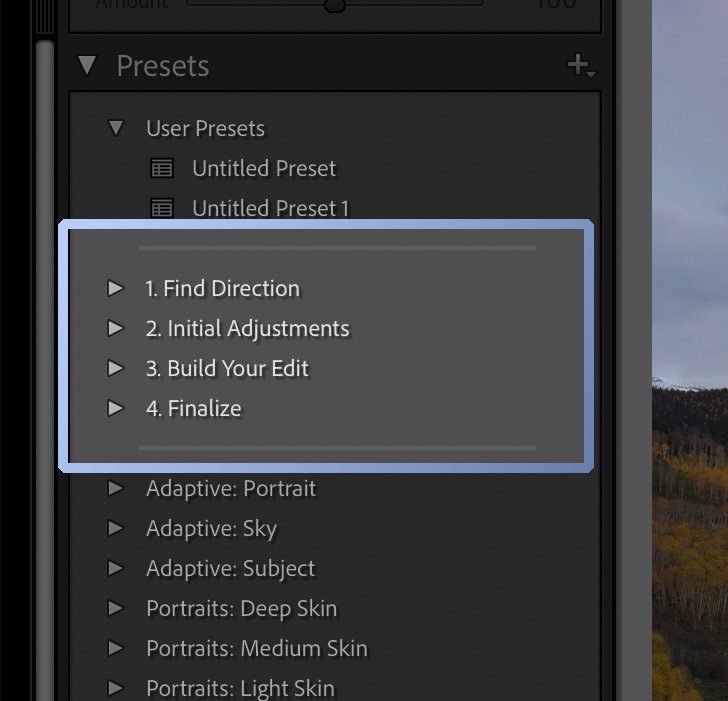
Navigate to the “PRESETS” Folder and you’ll find 4 zip files: Find Direction, Initial Adjustments, Build Your Edit, and Finalize
Import each of these and they should appear within their own section in Lightroom - You’re all done!
If you want to install this for mobile, you’ll have to install them through Lightroom for Desktop and let the presets sync over Adobe Cloud for them to show up on your phone or tablet. The method to install this without a desktop is extremely tedious thus it is not something currently offered in this version but if you’d like to be able to contact me.